Receiving server
Perform settings to receive mails such as Inbound Webhook or emails received using email forwarding (inbound emails) or If e-mail (bounce e-mail) returned from the destination server when e-mail delivery fails.
In Standard plan, you can only set the allowed domains for Inbound.
In OEM / Pro plans, if the receiving server is not in use, the "Inbound server settings" will not be displayed. In Business / Enterprise plans, an option purchase is required to use the receiving server.
Setting the receiving server
-
Login to management console and click the
server compositiontab. -
Click the server composotion on the server configuration list.
-
Server settingsdialog will be displayed. -
Click the
receiving server settingsmenu.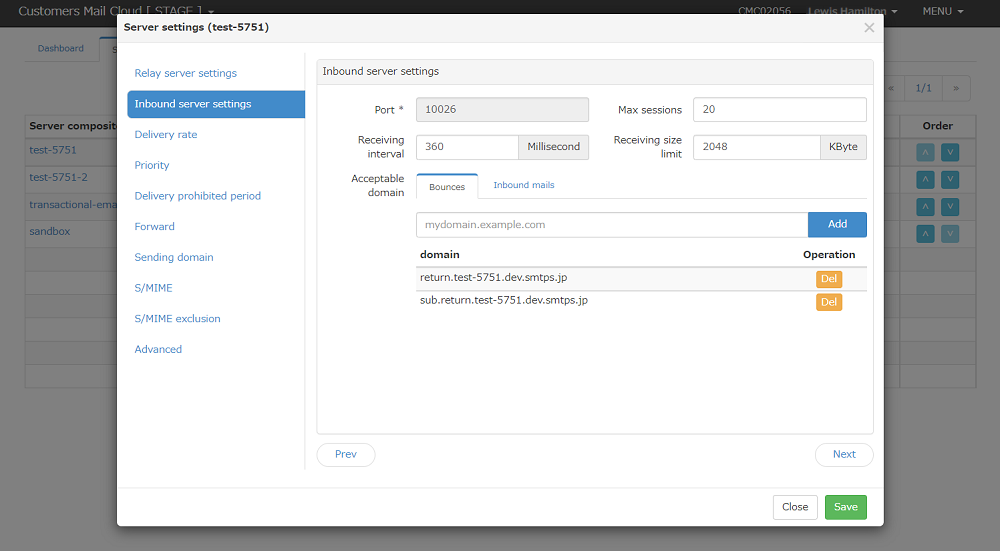
-
Following items will be displayed.
Item Required Description Port Yes Bounce mail and inbound mail are forwarded from port 25 to port 10026 and received. This value cannot be changed. Max sessions Yes Input the maximum number of simultaneous SMTP session connections that can be accepted. Specify in the range of 1-100. Receiving interval Yes Input the interval (processing time per mail) for receiving mail from the mail relay source server in milliseconds. Specify in the range of 10-10000. Receiving size limit Yes Input the content size of the received email in KByte units. Acceptable domain No Input the domains that you want to allow email reception. See below for details. -
Settings will be saved in management console when clicking the
savebutton. -
In the receiving server settings as well as the relay server settings, Receive flow control, Receive size control can be performed.
about condigions for judgement of spam mail regarding permitted domains for receiving
In the following cases, the email will be judged as spam mail and rejected.
-
If the header from is a permitted domain of the receiving server
Even though the email is supposed to be received from an external source, it is judged to be suspicious because the from field is in thename of the recipient's own domain.
-
If the header from and to are the same email address
This is also judged as suspicious email addressed to you.
Receiving the bounce
Perform settings to receive bounce emails.
Initial settings
return.SUBDOMAIN.smtps.jp is registered in the reception permission domain, and in Advanced Settings -> Envelope From domain, you can perform the rewriting settings to return.SUBDOMAIN.smtps.jp
Note
If you want to return the bounce mail to the envelope From set by the mail relay source server, change the envelope From to the "Do not rewrite" setting.
Rewrite the domain of the envelope From to the following, and Customers Mail Cloud will receive the bounce mail.
| Server configuration | Domain |
|---|---|
| sandbox | return.sandbox.smtps.jp |
| transactional-email | return.te.smtps.jp |
Using your own domain
Describes how to use your own domain for the envelope From.
STEP1 : Designing your own domain
In order for Customers Mail Cloud to receive bounce emails, designing the domain used for the envelope From is required.
For example, both the header From and the envelope From use info@example.com and @example.com is the domain that operates your organization's email address.
In such cases,because It is necessary to separate the reception of normal mail and bounce mail, the envelope From must be assigned a subdomain of the header From.
Before Change
| Item | Mail address |
|---|---|
| header From | info@example.com |
| envelope From | without settings (uses info@example.com) |
After Change
| Item | Mail address |
|---|---|
| Header From | info@example.com |
| Envelope From | info@return.example.com |
STEP2 : Setting the MX record
Register the receiving server in the MX record of the domain that operates the envelope From. (This operation is done on the DNS server that manages your own domain)
| Server configuration name | Receiving server |
|---|---|
| SUBDOMAIN | SUBDOMAIN.smtps.jp |
| Server configuration name | Receiving server |
|---|---|
| sandbox | sandbox.smtps.jp |
| transactional-email | te.smtps.jp |
STEP3: Setting the SPF record
Specifies the SPF record provided by Customers Mail Cloud for the domain that operates the envelope From. For more about SPF record please refer to Registering the SPF.
STEP4 : Setting your own domain
There are two ways to set your own domain to the envelope From.
Sender Domain Settings
When it is necessary to set the domain of the envelope from for each header from, such as when operating DMARC, perform the 'envelope from' settings from sender domain settings.
Advanced Settings
To rewrite the envelope from of all emails sent via Customers Mail Cloud at once , operate the 'envelope from' settings from "Advanced Settings".
Warning
Rewriting the envelope from set in "Sender domain settings" has priority over the settings in "Advanced settings".
STEP5 : Receiving the bounce
-
Click the "Receive Server Settings" -> Bounce tab of the allowed domains.
-
Input the envelope from domain of (return.example.com in this example).
Domains set to envelope from will automatically receive bounces.
Receiving inbound
For using Webhook and mail forwarding performs settings to receive mails.
This section describes the settings to receive by mail forwarding and Inbound Webhook of Customers Mail Cloud (emails sent by email sending applications such as email forms).
STEP1 : Design of destination email address
Customers Mail Cloud decides the recipient email address for it to accept email.
| Item | Mail address |
|---|---|
| destination email address | info@mailform.example.com |
STEP2 : MX record settings
Register the following SMTP host in the MX record at mailform.example.com which assigned as the domain of the destination email address to receive emails with Customers Mail Cloud. (This operation is done on the DNS server that manages mailform.example.com)
| Server configuration name | SMTP host |
|---|---|
| SUBDOMAIN | SUBDOMAIN.smtps.jp |
| Server configuration name | SMTP host |
|---|---|
| sandbox | sandbox.smtps.jp |
| transactional-email | te.smtps.jp |
STEP3 : Receiving permission domain settings
Click the "Receiving Server Settings" -> "Inbound" tab of the allowed domain. Input the domain of the destination email address (mailform.example.com in this example).
STEP4 : Webhook Settings
When using an inbound webhook, register the notification conditions for the webhook.
Click "MENU" -> "API Settings" at the top right of the management console screen, Click the "Webhook" tab -> "Inbound" tab.
Set the following in the notification conditions.
| Items | Value |
|---|---|
| Header name | Input 'To' |
| Header value | Input a regex for the destination address that handles the Inbound Webhook .(info@mailform\.example\.com in this example) |
STEP5 : Mail forwarding settings
When using mail forwarding, register the forwarding conditions of the receiving server of mail forwarding.
Please refer to the receiving server of "Mail forwarding" -> "Add filter".
Saving the settings
The settings will be saved when the "Save" button is clicked or when the screen transitions to another setting screen (menu click, next button click, etc.) are saved.
Reflecting settings
This will be enabled when the saved settings reflected in mail server.After saving all the settings including other settings in the management console please do reflect settings in the mail server.