DKIM
DKIM (Domain Keys Identified Mail) is a technology that verifies the validity of the sender of the email (the domain of the from address) and the mail body. In DKIM the mail sender publishes their public DKIM key to their DNS. Then, the generated secret key pair is used to insert the DKIM signature into the email headers. The receiving mail server then makes a request to the DNS and looks for the public DKIM key and uses that to verify the DKIM signature.
Large companies like Google, Yahoo and other major ISPs implement the core technlogies of DKIM. With its use you can avoid the risk of phishing attacks where malicious senders attempt to fool unasuming users into giving away their usernames, passwords and confidential information. Furthermore, with DKIM technology it is possible to tell the difference between illegitamate and legimate senders.
Customers Mail Cloud provides a function to add a DKIM signature to emails sent via SMTP or the API. To do so, register the sender's domain in the management console and issue a DKIM key. Then, you can send a DKIM-signed email by publishing the public key to the your DNS.
Note
For Business / Enterprise / OEM plans, the number of DKIM domains that can be registered is limited based on your contract. While it is possible to register beyond the limit, please be aware that our sales team will contact you later regarding the contract details.
Adding DKIM keys
Add the From address's domain that DKIM uses.
Issuing a DKIM key
-
Log into management console and click the
DKIM settingstab. -
Click the
Add new domainbutton.
-
Input the domain, select the key length (1024 bits or 2048 bits) and click the
Savebutton.Note
As for the DKIM key published by Customers Mail Cloud, you can choose the key length 1024 bits or 2048 bits.
2048 bits length DKIM key is more secure than 1024 bits. although if you want to use this, you should ask your domain's DNS providors wheather these providors is able to accept 2048bits DKIM key.
-
The DKIM selector modal will then be displayed. From this modal you can copy the
valueand check the status of your DKIM record with theConfirm DNSbutton at the bottom right.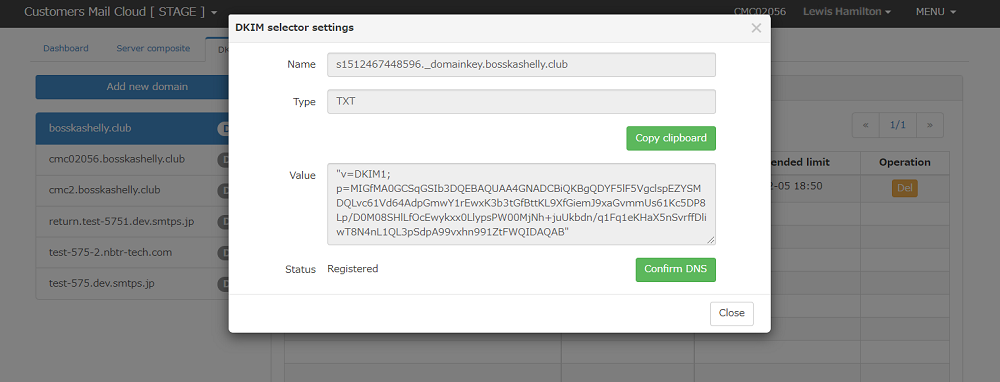
Publishing the DKIM key onto a DNS
Publish the DKIM key issued by the management console on your DNS that manages the you, the sender's domain. We will use the Amazon Route 53 DNS service to illustrate an example in this section.
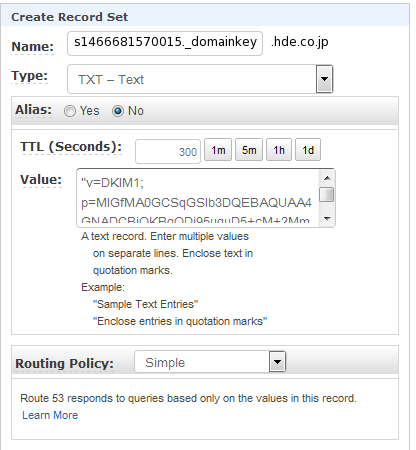
| Item | Value |
|---|---|
| Name | Input the DKIM selector in the modal's record name. selector._domainkey |
| Type | Select TXT - Text |
| Value | Input the modal's record value of the DKIM selector. |
Checking the DKIM key
Click the DNS confirmation button after you registered the DKIM key to the DNS. If the DNS lookup of the DKIM key is successful, the status of the selector will read DNS is registered.
Note
If you want to verify a DNS at a later date because it takes time to register, please perform the following actions:
- Click the domain from the domain list in the menu on the left of the "DKIM settings" tab.
- Click the selector from "selector list".
- The "DKIM selector" modal will be displayed. Click the "Confirm DNS" button.
Reflecting the settings onto the mail server
This selector can be operated when the status of the selector is DNS is registered.
To have the saved reflect settings on the email server follow these instructions.
Updating DKIM keys
The DKIM keys are created as 1024 bit RSA keys so that they fit into the DNS record size limit. For this reason, it is necessary to change the key from time to time. In Customers Mail Cloud, the recommended deadline will be displayed with it's default set to once a year.
Follow the steps below to exchange keys.
In case of adding new selectors
-
Click the domain you wish to add selectors to from the menu on the left in the
DKIM settingstab. -
Click the
Addbutton above the selector list. TheDKIM selector settingsmodal will be displayed.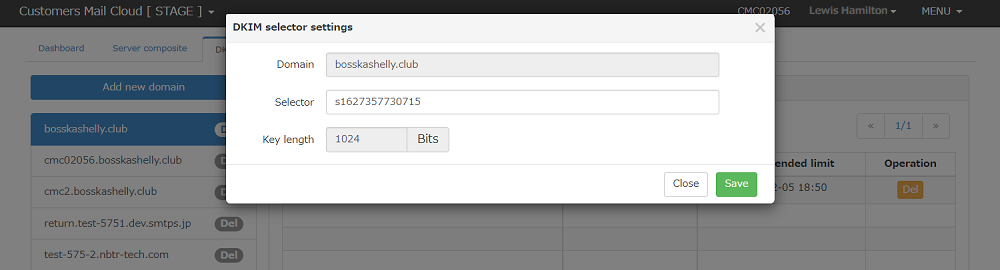
-
A
selectorwill be automatically assigned. -
Click the
Savebutton. -
DKIM selectormodal will be displayed. -
Click the
Confirm DNSbutton once the DKIM key is published. -
Once the selector status becomes DNS is registered, it will be possible to operate the new selector. At the same time this new selector is automatically selected in
sender domain settings > server settings > DKIM settings. -
Lastly, when you reflect this settings to the mail server, operation for the new selector will start.
Note
Customers Mail Cloud will resend mail up to 24 hours. When changing selectors, there is a possibility that emails signed with the old selector and emails signed with the new selector may coexist.
Please register both the old and new selector to the DNS. The old selector will not be affected even if it is deleted from DNS and more than one day has passed after changing the selector.
In case of changing the other registered selector
-
Click the
Server configuraiontab. -
Click the server configuration link that operates the new selector.
-
Click the
sender domain settingsat the left menu of theserver settingsdialog box.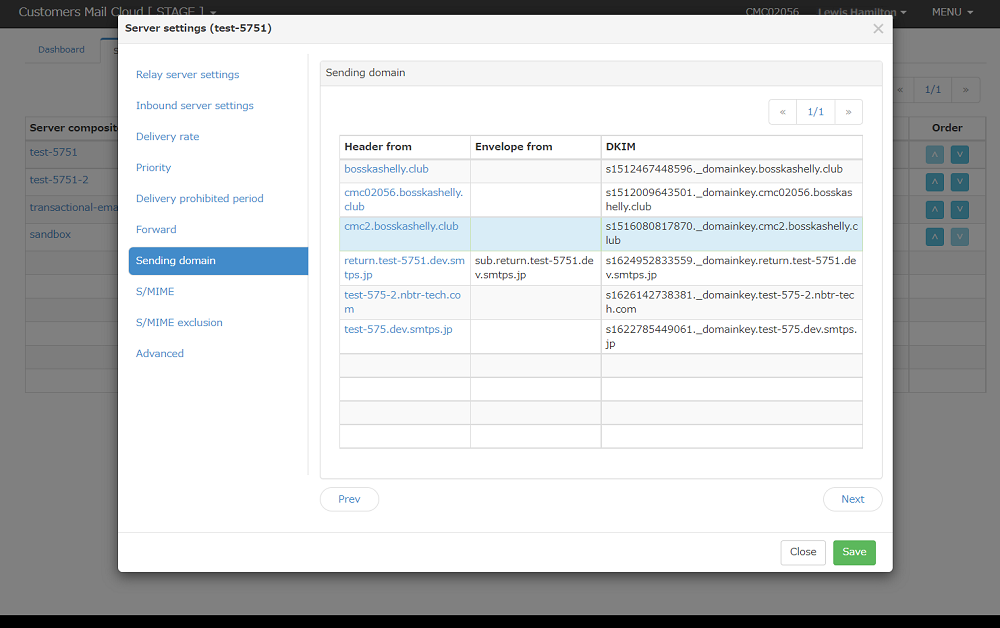
-
The list of the registered DKIM domain will be displayed.
-
Click the domain you want to change. The
Sender domain settingsdialog box will be displayed.
-
Mark as checked the new selector and unmark the check for the old selector on
DKIM settings. -
Click the
Savebutton. -
Lastly, when you reflect this settings to the mail server, operation for the changed selector will start.
Deleting the DKIM key
If you change the DKIM key and the old selector is no longer needed or the sender domain itself is no longer needed,you can stop the operation of DKIM and delete the DKIM key by following the steps below.
Stopping the DKIM operation
-
Click the
server compositiontab. -
Click the link of the server composition which stops the DKIM operation.
-
Click the
sender domain settingsat the left menu ofserver settingsdialog. -
Registered DKIM domain list will be displayed.
-
Click the target domain.
-
A list of available selectors will be displayed in the
sender domain settingsdialog. Unmark the check of the selector that stops the operation.Warning
You can't stop the operation of the DKIM selector if you set the envelope from as "rewrite" at the "SPF settings" of the sender domain settings dialog.
-
click the "save" button.
Reflecting the settings to the mail server
Once you reflect this settings to the mail server, DKIM operation will stop. You can't add the DKIM signature to the send emails once you reflect the settings.
Deleting the DKIM key
You can replace the selector or delete the old selector that is no longer needed by following the steps below.
-
Click the
DKIM settingstab on the management console. -
Click the domain you want to operate from the domain list on the left menu.
-
Selector list will be displayed on the right.
-
Confirmation dialog will be displayed when you click the
deleteicon on the selector list. -
Input the login password and click the
deletebutton.
Warning
It is not possible to delete, If DKIM selector is in operation.
Deleting the domain
If the sender domain itself is no more needed, you can delete the domain that managed by DKIM settings by following the steps below.
-
Click the
DKIM settingstab of the management console. -
Confirmation dialog will be displayed when you click the
deleteicon at the domain list of the left menu. -
Input the login password and click the
deletebutton. -
Domain and selectors that registered into this domain will be deleted.
Warning
It is not possible to delete, If the DKIM selector for the domain is in operation.